Do you want to share your website data with an SEO specialist, or digital marketing consultant?
Here’s a quick guide on adding a user to your Google search console, analytics account, or Bing Webmaster Tools account.
Table of Contents
ToggleAdd a User to Google Search Console
Watch the video below to get started! Grant access to your Google Search Console account.
Now that you’ve seen the video tutorial, here’s a detailed breakdown of adding users in Google Search Console.
Step 1: Sign in to Google Search Console
Open your web browser and go to https://search.google.com/search-console
Log in using the Google account that owns the website property you want to share.
Step 2: Select the Property you want to share
If you manage multiple websites in Search Console, then make sure the correct one is selected in the top-left corner dropdown menu. Then select the property name.

Step 3: Open the Settings Menu
Click on the “Settings” link at the bottom of the left menu.

Step 4: Open Users and Permissions
Inside the Settings menu screen, click the “Users and Permissions” section.

Step 5: Add a New User
After that Click on the blue “Add User” button.
Step 6: Sign in to Google Search Console
A pop-up window will appear. Enter the email address of the user you want to add. Next, select the Full access option on the dropdown.

Once you’ve entered the email address and chosen the permission level, click “Add” to save your changes.
Note: You can manage user permissions or remove access entirely at any time.
Add a User to Google Analytics
Watch the video below to get started! Grant access to your Google Analytics account.
Now that you’ve seen the video tutorial on adding users to Google Analytics, let’s break it down step by step for those who prefer a written guide.
Step 1: Sign in to Google Analytics
Sign in to Google Analytics. Open this URL – analytics.google.com
Step 2: Open the Admin Panel
In Google Analytics, find the “Admin” menu at the bottom left.
Step 3: Choose the Right Level:
Navigate to the account, property, or view where you want to grant access. You can manage access at different levels within your Analytics setup.
Each one has an “Access Management” choice. Select whichever one makes sense for this particular user.
Step 4: Add emails for the new user(s)
You’ll see a list of all current users in the Access Management module. Click the blue “+” button in the upper-right corner.
This displays a menu with two options:
- Add Users
- Add User Groups
Click “Add Users“.
Enter the email address of the user’s Google Account.
Mark the box below to “Notify New Users By Email.”
Step 5: Set direct roles and data restrictions
Scroll down in the same module to find a section called “Direct Roles and Data Restrictions.”
Google Analytics offers three main permission levels:
- Viewer: Can view reports and data but cannot make changes.
- Editor: Can view and edit reports and data. ( Recommended )
- Administrator: Full control, including adding/removing users and managing permissions.
Choose the appropriate permissions level (Viewer, Editor, or Administrator). We recommended giving the Editor role permission to us.
Step 6: Add data restrictions
Down a little further, there’s a section for Data Restrictions. These allow you to hide more sensitive data from some users, like:
- Cost Metrics
- Revenue Metrics
Step 7: Add data restrictions
Once you’re done with the roles and restrictions, click the “Add” button.
You are done! If you had the “Notify New Users By Email” box checked, each new user receives an email and access the dashboard.
Add a User to Bing Webmaster Tools
Ready to share the power of Bing Webmaster Tools? Watch the video below
Now that you’ve seen the video tutorial, here’s a detailed breakdown of adding users in Bing Webmaster Tools Account.
Step 1: Log in to Your Bing Webmaster Tools Account
Visit https://www.bing.com/webmasters in your web browser and sign in using your credentials.
Step 2: Access Your Website
Once you’re logged in to your Bing Webmaster Tools account, you’ll need to access the website you want to add a user to.

Step 3: Navigate to User Management
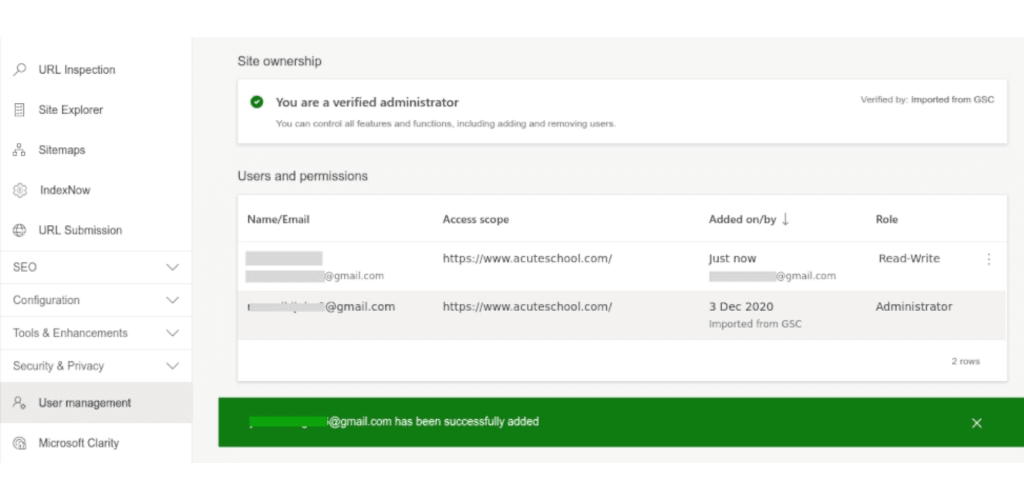
In the left sidebar menu, scroll down to the bottom and click on “User Management”

Step 4: Add a User
Click on the “Add User” button at the top-right corner of the User Management page.
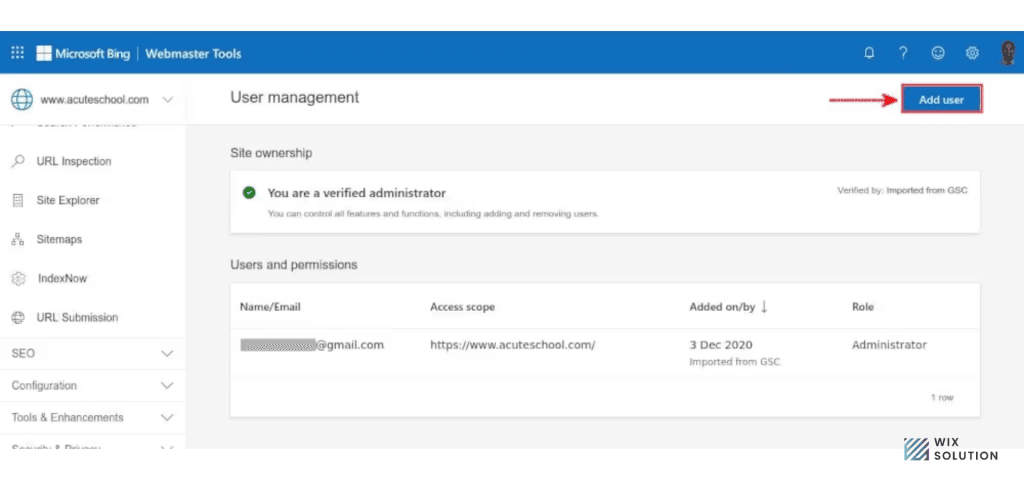
After clicking Add User, write down the email address of the person you would like to share the access.
Then select the role I prefer administrator and click the add button to proceed.
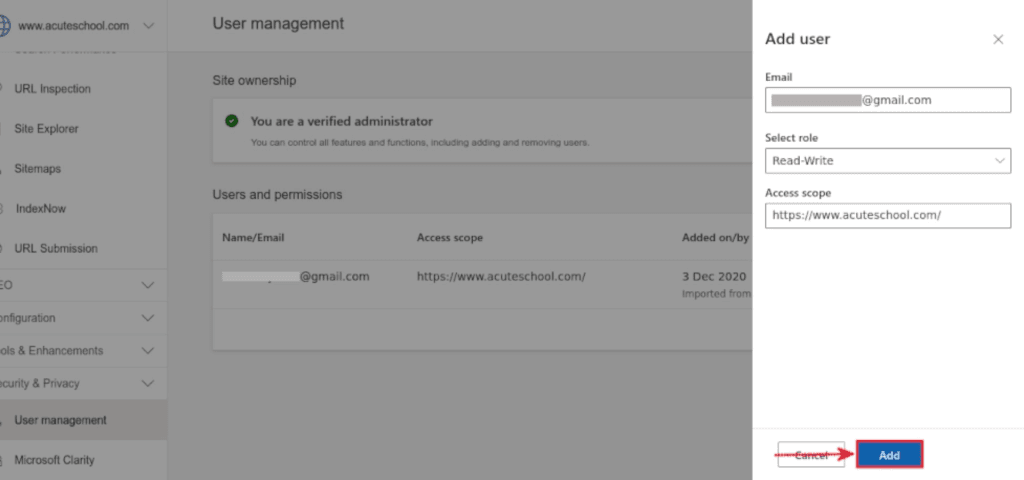
You will see a success message that the user has been successfully added.
By following these steps, you can easily add users to your Google search console, analytics account, or Bing Webmaster Tools account and share valuable website insights with us. If you want to read more blogs to improve your ranking than visit our Wix SEO blogs.

